Here’s a blunt truth: the coolest-looking rack won’t keep you safe when you’re training alone.
What matters is simple—weight capacity, ceiling and floor fit, and safeties you can trust.
This guide cuts through confusing specs and gives a quick, practical checklist to pick a rack you’ll still use in two years.
Measure your space, plan for heavier lifts, and we’ll walk through the exact features that actually change your lifting life.
Understanding Home Gym Power Rack Needs and the Fastest Way to Choose the Right One
Most lifters start rack shopping with one question: what actually matters when you’re training alone at home. The answer’s simpler than the spec sheets want you to believe. You need a rack that holds more weight than your heaviest lift, fits your ceiling and floor, and includes safety hardware you’ll actually trust when there’s no spotter around.
The fastest way to decide? Measure your space first. Estimate where your loaded barbell weight will be in two years (not today). Add 200 pounds to that number. Then match those figures to a rack’s height, footprint, and rated capacity. Most home gym racks handle 500 to 1,200 pounds, average model lands around 800. Heights usually run 82 to 91 inches, so if your ceiling’s under 7 feet, you’re shopping compact or folding options only.
Quick checklist before you go deeper:
- Weight capacity – Must beat your two-year goal lift by at least 200 lb
- Height – Compare rack height to your ceiling clearance minus a few inches
- Footprint – Check upright spacing and depth against your available floor space
- Safety hardware – Confirm the rack includes adjustable safeties or spotter arms
- Upright size – Larger tubes (like 3×3) handle heavier loads and more attachments
- Hole spacing – Tighter spacing around bench height lets you dial in bar position
If you’re a beginner lifting under 300 pounds total, a basic 2×3 upright rack with 500 to 700 pound capacity and standard 2 inch hole spacing will work for years. Intermediate lifters pushing 400 pounds and up should look at 3×3 uprights, 11 gauge steel, and 1,000 pound ratings or better. Competitive or heavy lifters need bolt down capability and commercial grade frames.
Why Power Rack Confusion Happens in Home Gyms

Rack shopping feels overwhelming because manufacturers use wildly different designs, materials, and names without explaining what actually changes your lifting experience. A “power rack” from one brand might be a 90 inch bolted cage with 3×3 uprights. Another company sells a 72 inch half rack with 2×2 posts under the same label.
Steel thickness alone splits into 11 gauge versus 12 gauge. Upright tubes come in 2×3 or 3×3 dimensions. Hole spacing varies between 1 inch Westside patterns and standard 2 inch grids. Safety hardware ranges from simple pin and pipe catches to hydraulic straps and external spotter arms. Add folding racks, squat stands, combo units, and models with built-in storage, and the category fractures into dozens of subcategories.
The real confusion comes when you try to compare features across price points without knowing which specs matter for your actual training. A $400 rack with twelve included attachments sounds better than a $1,200 bare frame until you realize the cheaper unit uses thinner steel, can’t support your planned lifts, and wobbles during heavy squats. Most buyers don’t know that 11 gauge steel is thicker and stronger than 12 gauge, or that 3×3 uprights allow heavier attachments than 2×3 posts. The industry assumes you already understand terms like Westside spacing, crossmember depth, and flip down safeties, so product pages rarely define them.
Selecting the Right Type of Power Rack for Home Gyms
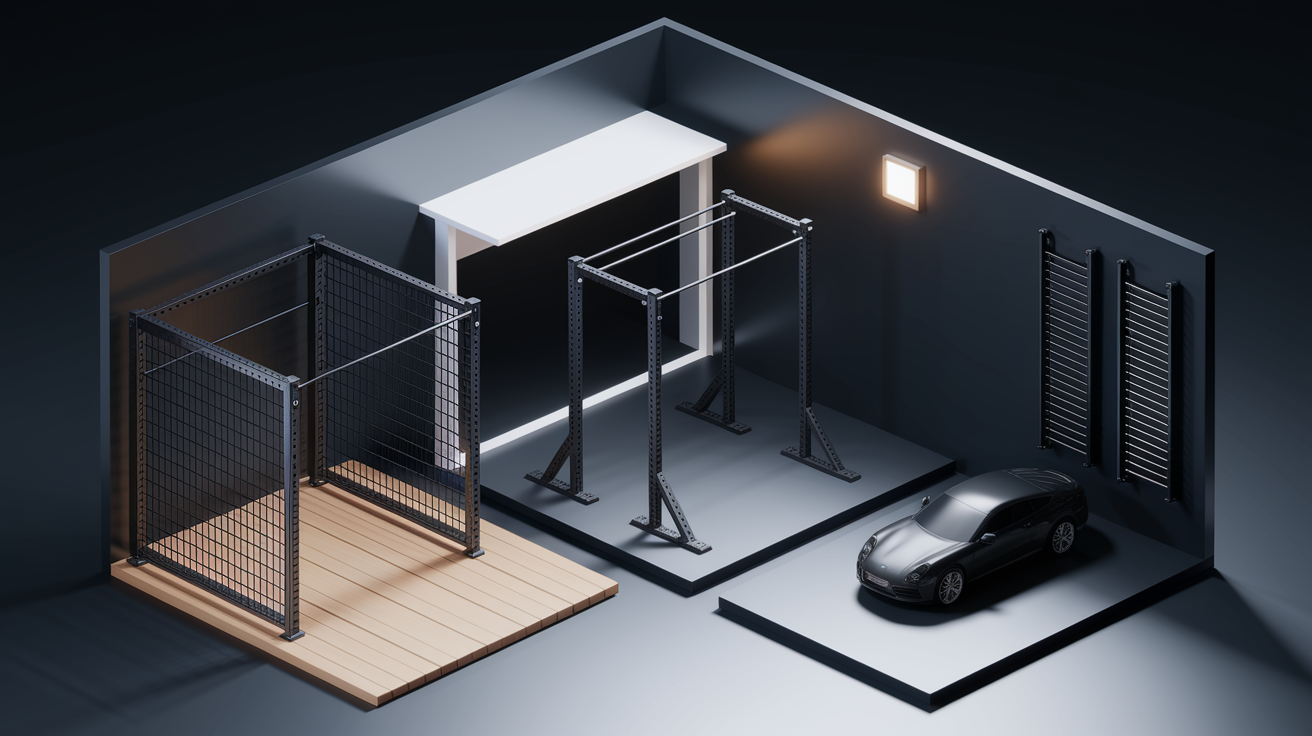
Choosing the right rack style matters more than any single feature because the design dictates your safety, exercise variety, and how much floor space you’ll lose. Four main categories split cleanly by structure and use case.
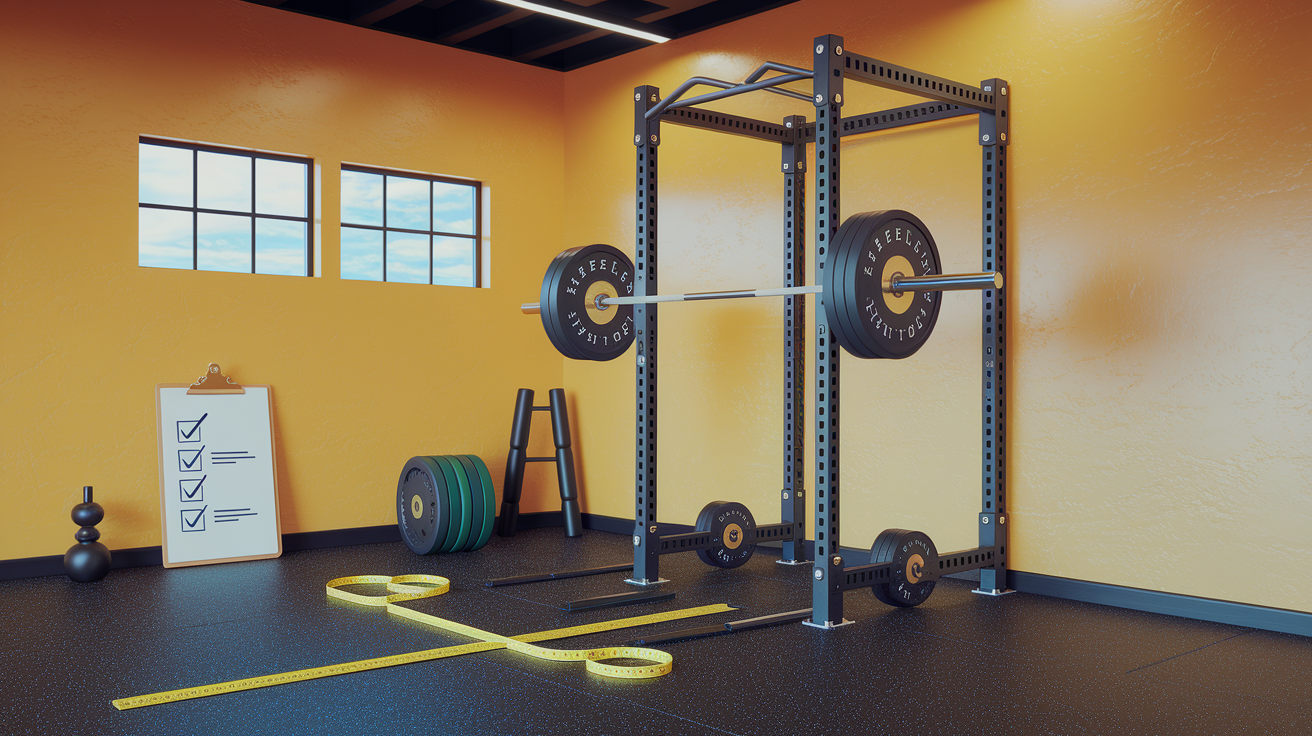
Full Power Racks
A full power rack uses four vertical uprights connected by top crossmembers to form an enclosed cage. Safety catches anchor on both sides, so you can bail on a failed squat or bench press without a spotter. These racks take the most floor space, usually require bolting for maximum stability, and cost the most. But they support every barbell movement safely and accept the widest range of attachments. If you train alone and lift near your limits, this is the only style that removes spotter dependency.
Half Racks
Half racks use two to four uprights but leave one side partially or fully open. They save 30 to 50 percent of the footprint compared to full cages and still provide adjustable J hooks and safeties, though catches only anchor on one or two sides instead of a full perimeter. This design works well in tight garages or basements where you can’t give up an entire 4×4 or 4×6 foot section. The tradeoff? Slightly lower stability under extreme side loads and limited attachment flexibility.
Squat Stands
Squat stands are the simplest design. Two vertical posts with J hooks and no integrated safety catches. They’re compact, portable, and cost a few hundred dollars, but they don’t protect you if you fail a rep without a spotter. Some lifters pair stands with separate spotter arms, but the setup isn’t as secure as a welded cage. Use stands only if space or budget is severely constrained and you plan to train conservatively or with a partner.
Folding Racks
Folding racks mount to a wall and swing up flat when not in use. Heights run from 82 inches (short models) to 91 inches (tall models), and they free floor space in multi-use rooms like garages that also park cars. The catch: they require strong walls rated for anchoring heavy bolts, and you can’t add as many attachments because the frame isn’t free standing. They’re ideal for apartments or shared spaces where a permanent cage isn’t practical.
| Rack Type | Best Use | Space Requirement |
|---|---|---|
| Full Power Rack | Solo heavy lifting, maximum safety and versatility | 4×4 to 4×6 ft footprint, 7 to 9 ft ceiling |
| Half Rack | Space limited home gyms, intermediate lifters | 3×4 to 3×5 ft footprint, 7 to 9 ft ceiling |
| Squat Stand | Minimal space or budget, light to moderate loads | 2×3 ft footprint, 6 to 7 ft ceiling |
| Folding Rack | Shared spaces, fold flat storage | Wall mounted, 82 to 91 in height, strong wall required |
Evaluating Build Quality and Strength in Home Power Racks
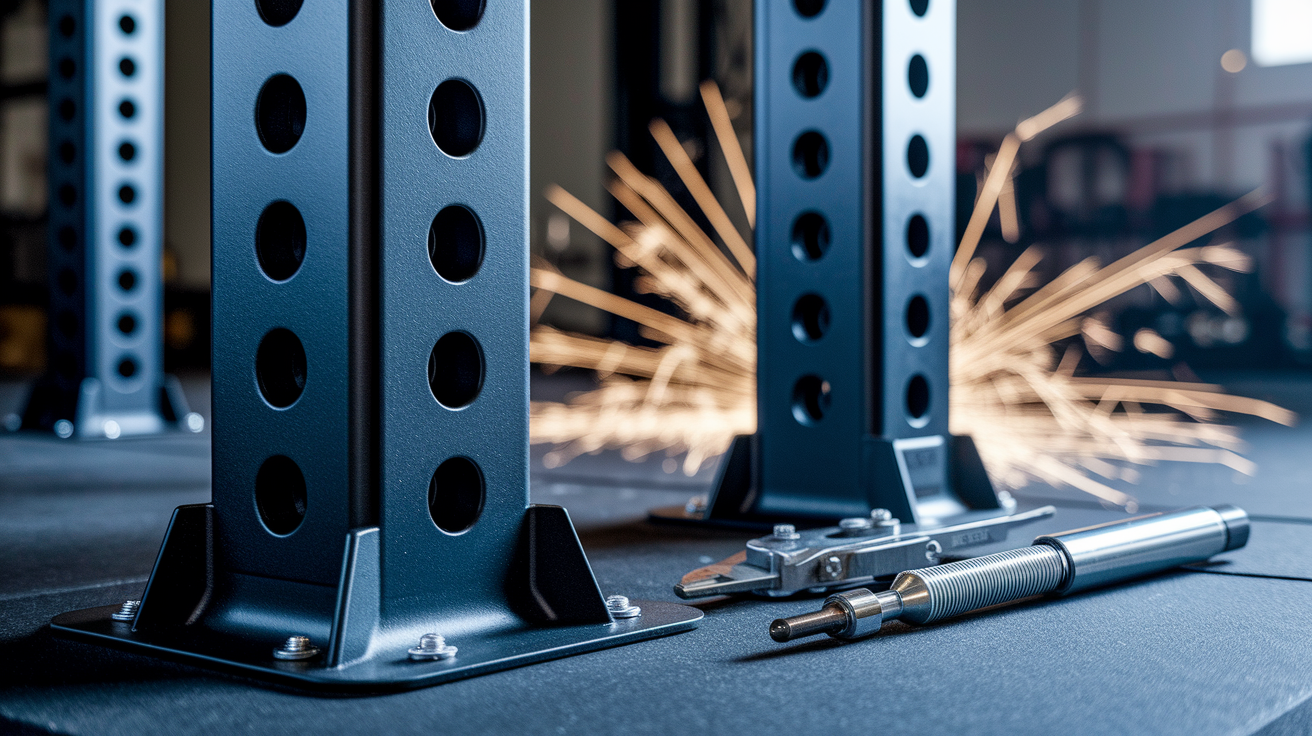
Steel gauge and upright dimensions determine whether a rack will handle your lifts five years from now or start flexing under load within six months. Lower gauge numbers mean thicker steel. 11 gauge is stronger and more durable than 12 gauge, and it’s the standard for racks designed to last decades. Budget racks often use 12 gauge or even 14 gauge tubing to cut costs, which works fine for beginners lifting under 300 pounds total but becomes a weak point once you’re squatting or deadlifting 400 plus.
Upright tubing size follows a similar pattern. Entry level racks use 2×3 inch posts, mid tier models step up to 2×3 with thicker 11 gauge walls, and premium racks build with 3×3 uprights and 11 gauge steel. The larger 3×3 format adds rigidity, supports heavier attachments like cable systems or dip bars without flexing, and provides more surface area for bolting accessories. Competitive lifters and anyone planning to load over 500 pounds should prioritize 3×3 uprights. Smaller posts can technically hold the weight but may wobble slightly under dynamic loads like heavy rack pulls or drop sets.
Here’s what each build spec translates to in real use:
- 11 gauge steel – Strong enough for 1,000 pound capacity and up, minimal flex, commercial durability
- 12 gauge steel – Adequate for 500 to 800 lb, slight flex possible under max loads
- 2×3 uprights – Mid tier strength, good for most home lifters under 500 lb total
- 3×3 uprights – Premium strength, best for heavy or competitive lifting, more attachment options
- Weld quality – Inspect corners and crossmember joints. Clean, even welds indicate better manufacturing
If you’re lifting under 400 pounds and staying recreational, a 12 gauge rack with 2×3 posts will handle your training. Once you’re benching 225, squatting 315, or planning to add cable attachments and plate storage, invest in 11 gauge and 3×3 construction. The cost gap between budget and mid tier frames is often only a few hundred dollars, but the durability difference stretches across years of use.
Comparing Hole Spacing, J-Cups, and Safety Hardware
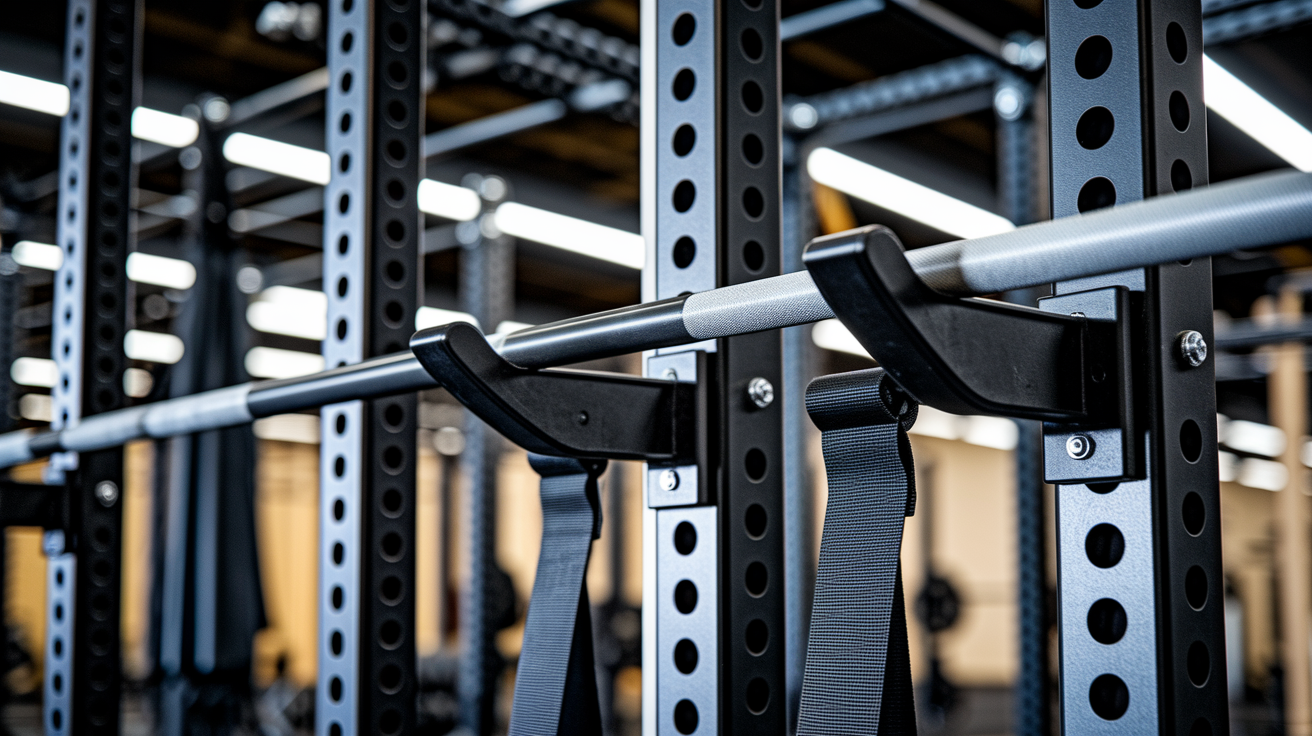
Hole spacing dictates how precisely you can position the barbell for movements like bench press, pin press, or rack pulls where an inch or two makes the difference between a comfortable setup and a strained shoulder. Standard 2 inch spacing works for most exercises, but Westside hole spacing (tighter 1 inch intervals around the bench press zone) lets you fine tune bar height to your exact arm length and bench thickness. If you’re taller than 6 feet or shorter than 5’6″, Westside spacing becomes a practical upgrade rather than a luxury feature.
J cups are the metal hooks that hold your barbell when you’re not lifting, and cheaper models use bare steel that can scratch bar knurling over time. Better J cups add UHMW plastic liners or rubberized coatings to protect the bar and reduce noise when you re-rack. Check that J cups lock securely into place and don’t slide or tilt under uneven loading. If they feel loose during setup, they’ll shift during a heavy set.
| Hardware Type | Best Use | Noise Level |
|---|---|---|
| Pin and Pipe Safeties | Heavy rack pulls, pin presses, static catching | High – metal on metal contact creates loud clangs |
| Safety Straps | Squats, bench press, softer catch for failed reps | Low – straps absorb impact and reduce shock noise |
| Spotter Arms | External safety, flexible placement outside the cage | Medium – depends on bar drop height and arm material |
Safety hardware comes in three main styles. Pin and pipe safeties insert through upright holes and create a rigid horizontal bar. They’re bulletproof for catching heavy loads but loud and harsh on the barbell if you drop from height. Safety straps use thick nylon webbing anchored at both ends, offering a softer catch that’s quieter and easier on your bar’s finish, though they may sag slightly under extreme weight. Spotter arms are external platforms that attach to the uprights and extend outward, giving you adjustable safety without filling the interior cage space.
If you train alone and push near failure regularly, prioritize straps or spotter arms for squats and bench press. They reduce the shock of a failed rep and lower injury risk. Pin and pipe safeties excel for rack pulls and pin presses where you intentionally start from a dead stop on the bars. Many lifters buy both styles and swap them depending on the workout.
Planning Home Gym Space and Rack Footprint
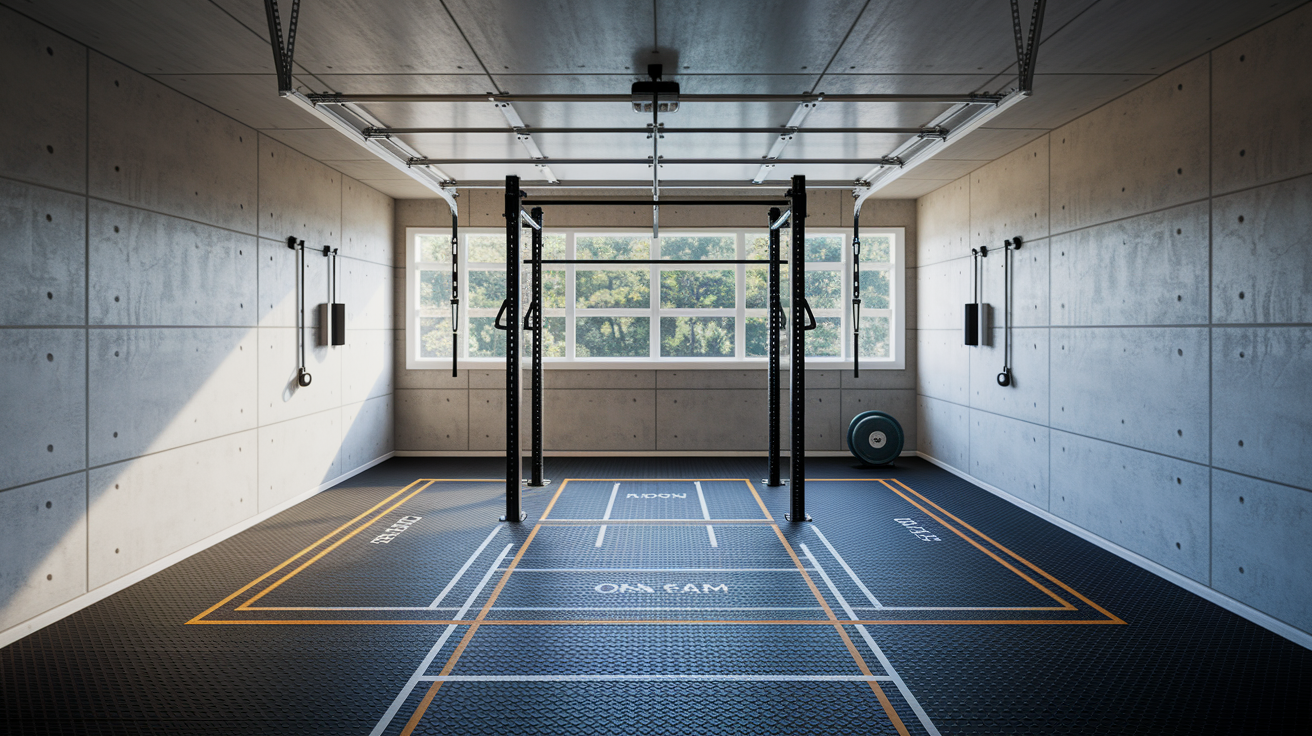
Measure twice before ordering a rack. Returns cost time and money, and a cage that doesn’t fit your ceiling or floor turns into an expensive mistake. Start with ceiling height: most full size racks run 82 to 91 inches tall, and you need at least 7 feet of clearance for basic use. Add 2 feet if you plan to do pull ups or overhead presses inside the cage, bringing the realistic minimum to 9 feet. Basements with 7 foot ceilings limit you to compact or folding racks, and even those require careful measuring.
Floor footprint breaks into two dimensions. Width (side to side upright spacing) and depth (front to back crossmember distance). A standard full rack occupies 4 to 6 feet of width and 3 to 5 feet of depth, plus you need clearance for the barbell to extend past the uprights. Add 2 feet in front and behind the rack for safe bar path during squats and bench press. If you’re adding attachments like dip bars or lat pulldown cables, budget another foot on each side. Tight spaces favor half racks or squat stands. They cut footprint in half but sacrifice some safety and attachment options.
Your planning checklist before measuring:
- Measure ceiling height from floor to lowest obstacle (duct, beam, or light fixture)
- Measure floor width and depth where the rack will sit, including door clearances
- Add 2 feet to the front and rear of the rack footprint for barbell clearance
- Confirm the floor can support 500 pounds and up if you’re adding weight storage
- Check for electrical outlets, light switches, or HVAC vents that might interfere
| Dimension | Minimum Clearance | Ideal Clearance |
|---|---|---|
| Ceiling Height | 7 feet (basic use only) | 9 feet (pull ups, overhead press) |
| Width and Depth | Rack footprint + 1 foot per side | Rack footprint + 2 feet per side |
| Bar Path Front/Rear | 2 feet in front, 2 feet behind | 3 feet in front, 3 feet behind |
Choosing Attachments and Accessories for Home Power Racks
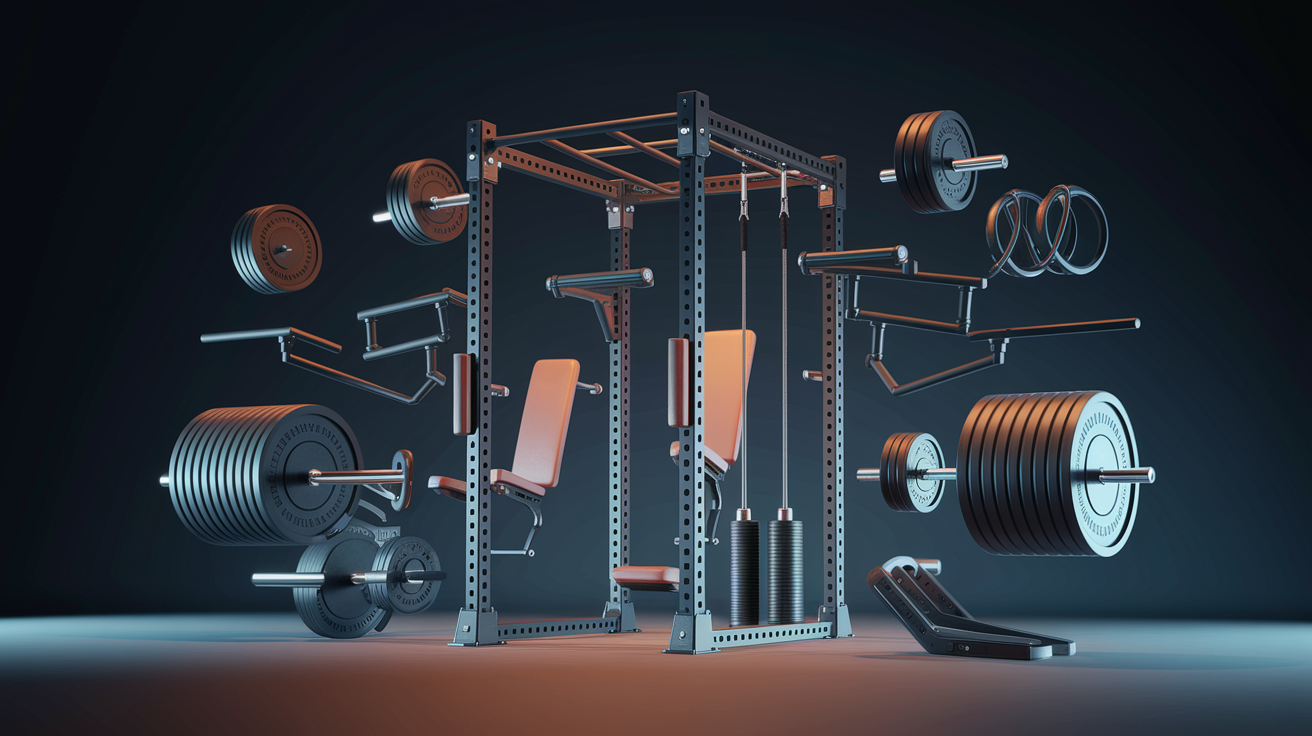
Attachments expand what you can train in a small space, but not all of them deliver equal value. Start with the essentials: pull up bars, safeties, and J hooks. Then add accessories as your training demands them. Buying a rack with every possible attachment pre-installed sounds convenient, but bundled packages often include cheap hardware you won’t use and inflate the upfront cost. It’s smarter to invest in a solid base rack first, then buy attachments that match your actual program.
Pull-Up Bars
Most racks include a basic straight pull up bar across the top crossmember, but you can upgrade to multi grip or angled bars for variety. Multi grip bars add parallel and neutral grips to reduce wrist and elbow strain during high volume pull up sessions. If you do weighted pull ups or muscle ups, confirm the bar and crossmember can handle your body weight plus added load. Cheap bars rated under 300 pounds can bend or pull welds loose over time.
Dip Bars
Dip attachments mount to the uprights and swing into or out of the cage depending on the design. Some models fold flat when not in use to save space. Dip bars add a high value bodyweight pressing movement without requiring a separate dip station, and they work for tricep extensions or inverted rows if you flip your grip. Check that the dip bar width matches your shoulder mobility. Most range from 18 to 24 inches, and narrow bars can cause shoulder impingement for broader lifters.
Cable and Pulley Attachments
Cable systems turn a basic rack into a functional trainer for lat pulldowns, cable crossovers, tricep pushdowns, and rows. Entry level pulley kits use weight stacks or loading pins. Premium setups add adjustable pulleys and dual cables for unilateral work. Cable attachments require strong uprights (3×3 posts handle the lateral tension better than 2×3 tubes) and they need overhead clearance for full range of motion. If your ceiling is under 8 feet, skip the lat pulldown and focus on horizontal cable work.
Landmine Attachments
A landmine adapter mounts to the base or upright and holds one end of a barbell for rotational presses, rows, and anti rotation exercises. Landmine work mimics functional movement patterns without needing machines, and the attachment costs under $50 in most cases. Some racks include a dedicated landmine post. Others require a bolt on or floor mounted unit. Either works fine, but integrated posts save floor space.
Plate Storage
Plate horns attach to uprights or the rear of the rack to organize weight plates off the floor. Horizontal horns increase overall width by several inches, while vertical posts or rear mounted storage keeps the footprint compact. Choose bumper plate storage if you use thicker rubber plates, or standard Olympic plate storage for iron plates. Overloading plate horns can tilt lighter racks, so confirm the base is stable or plan to bolt the rack down.
Which attachments offer the best value for small home gyms:
- Plate storage – Keeps floor clear and plates organized. Horizontal or vertical options available
- Dip bars – High value bodyweight pressing. Foldable models save space when not in use
- Landmine – Adds rotational and unilateral movements for under $50. Low space cost
- Multi grip pull up bar – Reduces wrist strain and adds grip variety for pull up volume work
- Cable pulley – Expands exercise variety significantly but requires strong uprights and ceiling clearance
Price Tiers and Value Assessment for Power Racks

Power rack pricing splits into three clear tiers, and understanding what each bracket includes prevents overspending on features you don’t need or under investing in durability that matters. The gap between a $400 rack and a $1,500 rack isn’t just branding. It’s steel thickness, weld quality, weight capacity, and how long the frame lasts under repeated heavy use.
Budget racks under $500 include squat stands and compact cages with 12 gauge steel, 2×2 or 2×3 uprights, and basic safeties. These work for beginners lifting under 300 pounds total and anyone who trains conservatively without pushing to failure. Expect limited attachment compatibility, narrower bases, and occasional flexing under max loads. Some budget models bundle multiple accessories to look feature rich, but the core frame quality usually suffers to hit the low price point. If you’re just starting out and unsure whether you’ll stick with lifting, a budget rack is a reasonable entry. But plan to upgrade within two to three years if you progress.
Mid range racks between $500 and $1,500 step up to 11 gauge steel, 2×3 or 3×3 uprights, better weld quality, and 800 to 1,000 pound capacities. This tier covers most home gym lifters who train consistently and expect to reach intermediate strength levels: benching over 200 pounds, squatting over 300, deadlifting over 400. You’ll find Westside hole spacing, better J cup liners, modular attachment compatibility, and sturdier crossmembers. Racks in this range often include basic pull up bars and safeties but sell dip bars, cable systems, and storage as add ons. Value is strongest here because you’re paying for durability without the premium finish and niche features that inflate top tier pricing.
Premium racks over $1,500 offer 11 gauge or thicker steel, 3×3 uprights, 1,000 pound plus capacities, numbered uprights for precise attachment alignment, custom powder coat colors, and full attachment ecosystems. These racks target competitive lifters, multi user gyms, or anyone who wants a buy it once solution that handles every barbell and cable movement without compromise. Fully loaded systems with integrated cable crossovers, plate storage, multi angle pull up bars, and specialty bars can exceed $3,000. The cost is justified if you train at or near your genetic strength ceiling, but recreational lifters rarely need this tier unless space, aesthetics, or long term ownership trumps budget.
| Price Tier | Key Features | Best For |
|---|---|---|
| Under $500 | 12 gauge steel, 2×2 or 2×3 uprights, 500 to 700 lb capacity, basic safeties | Beginners, light to moderate lifting, limited long term commitment |
| $500 to $1,500 | 11 gauge steel, 2×3 or 3×3 uprights, 800 to 1,000 lb capacity, modular attachments | Intermediate lifters, consistent training, realistic long term strength goals |
| Over $1,500 | 11 gauge or thicker, 3×3 uprights, 1,000 pound plus capacity, full attachment ecosystem, custom finishes | Advanced or competitive lifters, multi user gyms, buy once lifetime investment |
Assembly and Anchoring for Home Power Racks
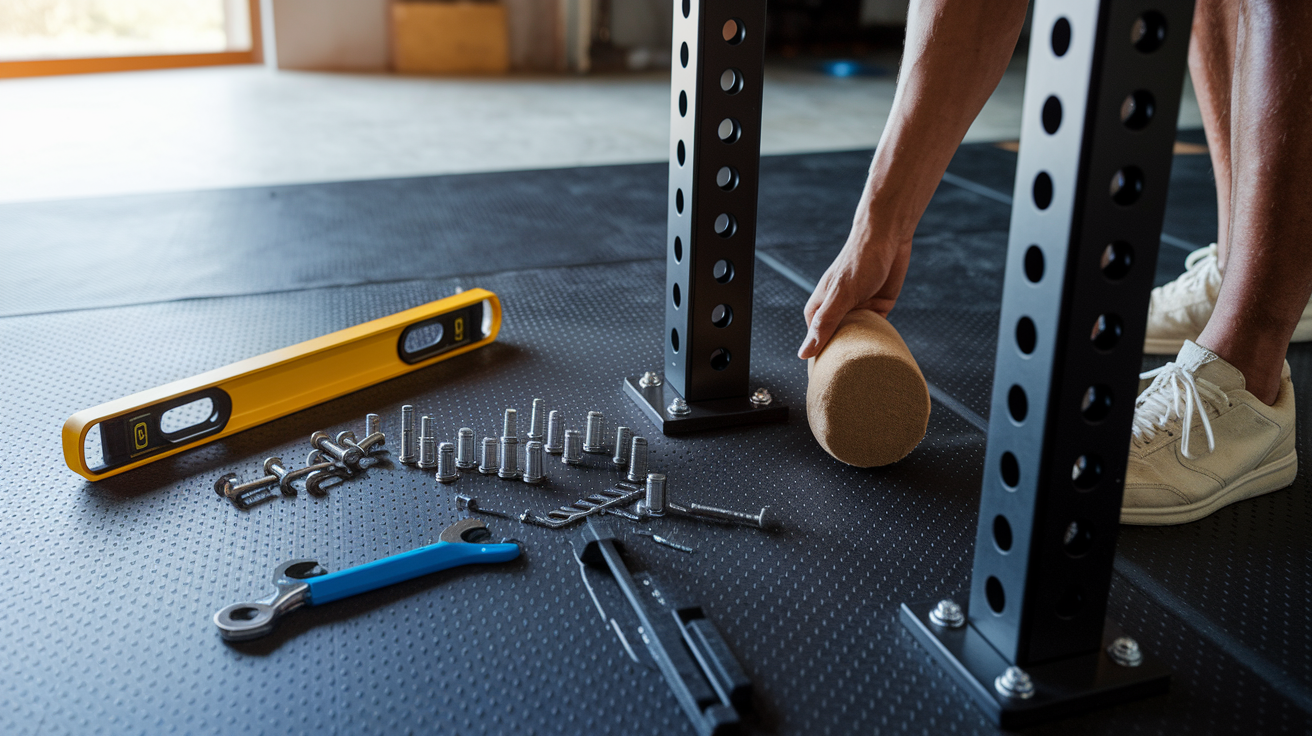
Most racks ship in large flat boxes with pre drilled holes, labeled hardware, and step by step instructions (either printed or linked via QR code to a setup video). Assembly takes one to three hours depending on rack size and whether you’re working alone or with help. You’ll need basic tools: a socket wrench set, an adjustable wrench, a level, and a rubber mallet for stubborn bolts. Some manufacturers include an Allen key set, but confirm that before opening the box.
Anchoring improves stability and safety, especially for taller racks or models without wide bases. Bolting the rack to a concrete floor using lag bolts and washers locks the frame in place and prevents tipping during heavy squats or pull ups. If you can’t drill into your floor (rental apartments, finished basements, or gym spaces you might relocate), choose a rack with wide flat foot bases and optional weight plate storage on the rear uprights. Loading the base with plates lowers the center of gravity and reduces wobble without permanent installation. Folding racks require wall mounting by design, so inspect your wall studs and use heavy duty lag screws rated for the rack’s maximum capacity.
Typical assembly sequence:
- Unpack all parts and group hardware by type. Confirm nothing is missing before starting
- Assemble the base frame (front and rear uprights, lower crossmembers) on the floor
- Stand the frame upright and level it using adjustable feet or shims
- Attach upper crossmembers, pull up bars, and top supports
- Install J hooks, safeties, and any included attachments
- Bolt the rack to the floor or load the base with plates if not bolting
Leveling matters more than most people realize. A rack tilted even a few degrees shifts weight unevenly across uprights and makes J hooks harder to engage smoothly. Use a bubble level on the top crossmember and adjust leveling feet or add shims under the base until the rack sits flat. If you’re bolting down, mark hole positions with a pencil, drill pilot holes slightly smaller than your lag bolts, then drive the bolts with washers until snug but not overtightened.
Preventing Long-Term Issues With Your Home Gym Power Rack
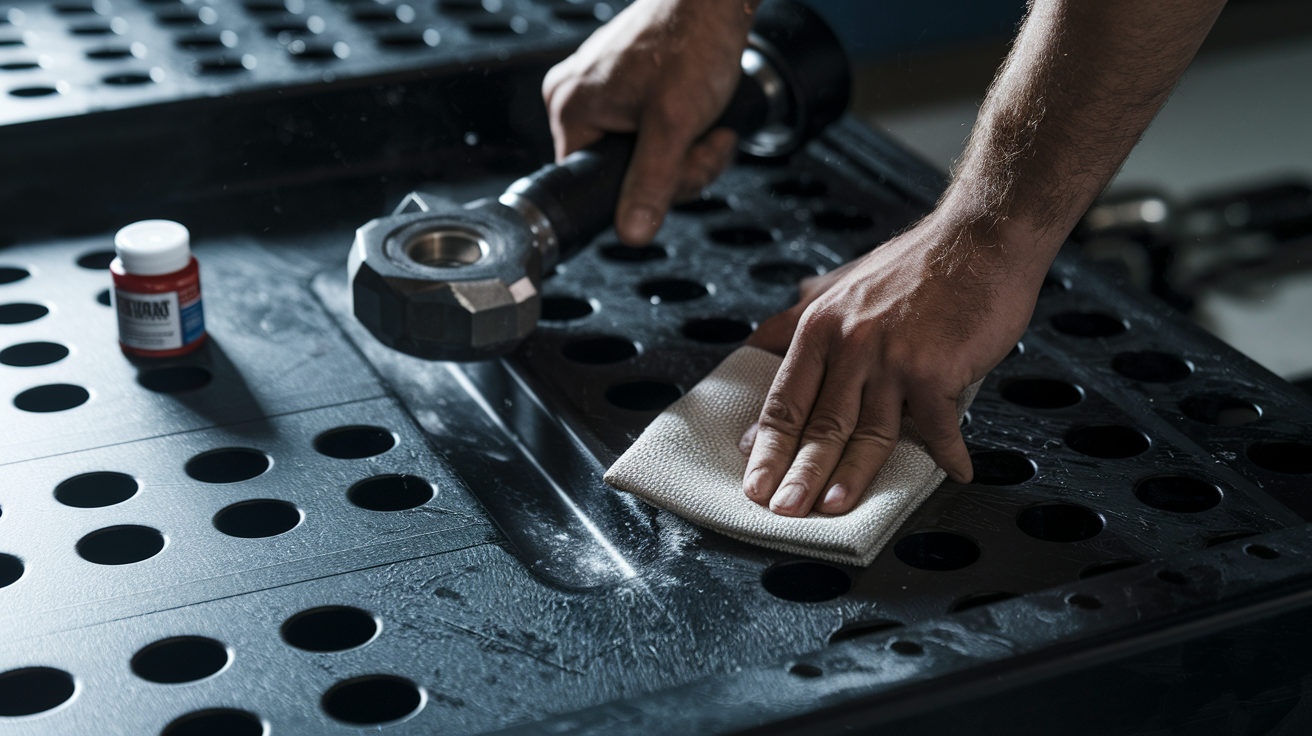
Regular checks catch small problems before they become safety risks. Start by inspecting bolts and fasteners every few months. Vibration from heavy lifts can loosen hardware over time, especially on racks that aren’t bolted down. Walk around the frame and hand tighten any bolts that feel loose, then use a socket wrench to snug them another quarter turn. Pay extra attention to crossmember bolts and J hook mounts since those bear the most dynamic load during racking and unracking.
Powder coat and paint finishes protect steel from rust, but sweat, chalk, and moisture slowly degrade the coating. Wipe down uprights and crossmembers after every session with a damp cloth, especially in humid climates or unheated garages. If you spot chips or scratches in the finish, touch them up with matching spray paint to prevent rust from spreading underneath. Check welds annually for hairline cracks, particularly at corners and where crossmembers meet uprights. Any visible crack means you need to stop using the rack and contact the manufacturer.
Simple maintenance checklist:
- Tighten all bolts and fasteners every 3 months or after moving the rack
- Wipe down powder coat and steel surfaces weekly to remove sweat and chalk
- Inspect safeties, J cups, and spotter arms for cracks, bending, or excessive wear
- Touch up scratched or chipped paint immediately to prevent rust
J cups and safeties take the hardest impact from dropped or re-racked bars. Inspect UHMW liners or rubber coatings monthly. Replace them when they’re torn, compressed, or missing chunks. Bent safeties are a red flag. If a pin or strap looks warped, it may have been overloaded and could fail during a future catch. Replace bent hardware immediately rather than risk a catastrophic failure mid lift.
When to Seek Expert Help or Upgrade Your Power Rack
You’ll know it’s time to upgrade when your lifts consistently approach 80 percent of your rack’s rated capacity, safeties show signs of permanent bending, or you’ve outgrown the attachment ecosystem and want features your current frame can’t support. Competitive lifters who started with a budget rack often hit this point within two to three years as squat and deadlift numbers climb past 400 pounds. A rack rated for 700 pounds might technically hold 600, but operating near the limit accelerates wear and increases flex under load.
Buying used racks can save money, but inspect carefully before committing. Look for weld cracks at every joint. Run your fingers along seams and check for gaps, rust stains, or flaking metal around welds. Bent uprights or safeties signal previous overloading or a dropped bar. Even minor bends compromise strength and make attachments sit crooked. Check that all holes align properly by inserting a pin through matching holes on opposite uprights. If the pin binds or won’t slide through, the frame is warped. Rust is manageable if it’s surface level and the powder coat is intact, but deep pitting or rust under the coating means the steel is compromised.
Red flags that warrant expert advice or immediate replacement:
- Visible cracks in welds, especially where crossmembers attach to uprights
- Bent or twisted safeties, J cups, or spotter arms that won’t sit level
- Uprights that wobble or flex excessively even when bolted down
- Rust that’s spread under the powder coat or created deep pits in the steel
- Your working weight exceeds 80% of the rack’s stated capacity and you’re still progressing
If you’re unsure whether damage is cosmetic or structural, send photos to the manufacturer’s support team or post in a lifting forum where experienced builders can assess the issue. Most reputable brands offer replacement parts for common wear items like J cups, safeties, and hardware, so you don’t always need a full replacement. When you do upgrade, sell or donate the old rack rather than letting it take up space. A beginner will appreciate a solid starter frame even if you’ve outgrown it.
Final Words
Match your space, lifting goals, and safety needs first. Choose the rack type that fits your ceiling and footprint, then check capacity, uprights, and safeties.
We covered build strength, hole spacing and J-cups, must-have attachments, price tiers, assembly tips, and signs you might need an upgrade. Keep the checklist handy while you shop.
Use this power rack buying guide for home gyms to make a clear, fast choice. Measure your space this week and you’ll be setting up a solid home gym soon.
FAQ
Q: How do I quickly choose the right power rack for my home gym?
A: The right power rack for your home gym depends on space, goals, and safety needs; choose a rack with about 800 lb capacity, the right height, and a compact footprint for your room.
Q: What are the must-check factors when buying a power rack?
A: The must-check factors when buying a power rack are weight capacity, footprint and height, upright size, safety hardware, hole spacing, and overall build durability.
Q: How does rack type (full, half, squat stand, folding) affect my decision?
A: Rack type affects safety, footprint, and versatility: full racks give max safety, half racks save space, squat stands offer limited safety, and folding racks fit tight rooms but need solid wall anchors.
Q: What weight capacity should I choose for home lifting?
A: Weight capacity should match your max lifts plus progress; aim for at least 800 lb for general home use and 1,000+ lb if you lift heavy or compete.
Q: How do I evaluate build quality and strength in a power rack?
A: Evaluating build quality means checking steel gauge, upright size (for example 2×3 vs 3×3), weld integrity, and rated capacity; thicker uprights and 11-gauge steel usually last longer.
Q: What should I know about hole spacing, J-cups, and safety hardware?
A: Hole spacing and safety hardware affect bench positioning and noise: Westside spacing helps the bench zone, pin-and-pipe gives rigid catches, while straps and spotter arms are quieter and easier to use.
Q: How much ceiling clearance and floor space do I need for a rack?
A: Ceiling and floor space needs mean measuring bar overhead and squat depth; typical rack heights are 82 or 91 inches, and ceilings should be seven to nine feet depending on attachments.
Q: Which attachments are essential versus optional for a small home gym?
A: Essential attachments for a small home gym are a pull-up bar, lined J-cups, safeties, and plate storage; dip bars, landmine, and cable conversions are useful but optional when space is tight.
Q: What price ranges should I expect and what do they buy?
A: Price ranges guide expectations: budget racks cost a few hundred dollars, mid-range sit around $500–$1,500, full-featured racks near $1,500, and premium commercial models can be $3,000 or more.
Q: Do I need to bolt my rack down and how hard is assembly?
A: Bolting your rack down is recommended for stability, especially for flat-foot or folding racks; assembly typically needs basic tools and a few hours, sometimes two people for heavy parts.
Q: How do I prevent long-term issues with my power rack?
A: Preventing long-term issues means tightening bolts on a schedule, inspecting welds and safeties, cleaning the finish, and replacing worn J-cups or safety straps promptly.
Q: When should I seek expert help or upgrade my rack?
A: You should seek expert help or upgrade your rack when you find weld cracks, bent uprights, damaged safeties, or when your lifting exceeds the rack’s listed capacity.